How to build a modern SPA client side (almost) frameworkless - Part 3
Welcome to the third part of this series of post where we are building a modern client side single page application using the bare minimum amount of tooling necessary.
In the second part we developed almost all the basic features of our application, but there is still one missing: the possibility to edit a note. We could just add a <textarea> in the note card in the existing page and call it a day. But there is another missing feature in our application: routing. To showcase both of them we will create a new page to display a single note, and we’ll add editing capabilities to that page.
To handle client side routing we would normally reach out for a library, but there is a recent addition to the web platform that allows us to do it in a “vanilla” way. It is the navigation API. The browser support is still limited to the chrome based ones, but is should improve soon, since both Firefox and Safari declared their interest in supporting it.
So, probably you wouldn’t use the navigation API in production right now (but you can if your target browser is only Chrome), but since our aim is to use the web platform as much as possible we will indeed use this API in this tutorial.
Routing
First of all we will write our router, let’s create a routes.js file with this content:
import { render, html } from 'https://cdn.jsdelivr.net/npm/uhtml/preactive.js'

import './pages/page-list.js'
import './pages/page-single.js'

function shouldNotIntercept(navigationEvent) {
  return (
    !navigationEvent.canIntercept ||
    navigationEvent.hashChange ||
    navigationEvent.downloadRequest ||
    navigationEvent.formData
  )
}

const root = document.querySelector('#root')

const loadListPage = () => {
  render(root, () => html`<page-list />`)
}

const loadSinglePage = (id) => {
  render(root, () => html`<page-single id=${id} />`)
}

const getPageLoader = url => {
  const matchSingle = url.pathname.match(/\/(.+)/)

  if (matchSingle) {
    const id = matchSingle[1]
    return () => loadSinglePage(id)
  } else {
    return () => loadListPage()
  }
}

navigation.addEventListener('navigate', navigateEvent => {
  if (shouldNotIntercept(navigateEvent)) {
    return
  }

  const url = new URL(navigateEvent.destination.url)

  navigateEvent.intercept({ handler: getPageLoader(url) })
})

const loader = getPageLoader(new URL(window.location.href))

loader()
This file is pretty much a copy and paste of the example provided in this article, however, let’s go trough it quickly:
navigation.addEventListener('navigate', navigateEvent => {
})
The navigation API works intercepting the browser native navigation events, the same way as a service worker intercept the fetch event.
Based on the characteristics of each event we can decide if and how to respond to that event.
  if (shouldNotIntercept(navigateEvent)) {
    return
  }
First of all there are some navigation events on which we don’t need to do anything, we just let them behave as they are supposed to:
function shouldNotIntercept(navigationEvent) {
  return (
    !navigationEvent.canIntercept ||
    navigationEvent.hashChange ||
    navigationEvent.downloadRequest ||
    navigationEvent.formData
  )
}
They are events that cannot be intercepted, hashChange, that trigger only an in page navigation, download requests and form data submission, so basically any event that does not trigger a page change.
  const url = new URL(navigateEvent.destination.url)

  navigateEvent.intercept({ handler: getPageLoader(url) })
If we want to intercept the navigation event, usually we check the url to decide which page to load.
const getPageLoader = url => {
  const matchSingle = url.pathname.match(/\/(.+)/)

  if (matchSingle) {
    const id = matchSingle[1]
    return () => loadSinglePage(id)
  } else {
    return () => loadListPage()
  }
}
We can use a simple regular expression, with a capturing group, to both check if the url matches a pattern and to get the url parameter.
Then based on the url we can load one page or another.
const root = document.querySelector('#root')

const loadListPage = () => {
  render(root, () => html`<page-list />`)
}

const loadSinglePage = (id) => {
  render(root, () => html`<page-single id=${id} />`)
}
To load a page we use the same code that we initially put in our index.js.
const loader = getPageLoader(new URL(window.location.href))

loader()
Finally at landing we do the same thing, but without waiting for a navigation event, that is not triggered at page load, and checking the window url.
The application entry point now it’s not the index.js anymore, we can delete that file actually, and replace the script loaded by the index.html page:
<script type="module" src="routes.js"></script>
Ok, now that we have a router that can handle 2 pages we need to write the second page component, let’s create a pages/page-single.js file with this content:
import { render, html, signal } from 'https://cdn.jsdelivr.net/npm/uhtml/preactive.js'
import {delNote, getNote} from '../data.js'
const TAG = 'page-single'
customElements.define(
TAG,
class extends HTMLElement {
constructor() {
super()
}
connectedCallback() {
this.id = this.getAttribute('id')
getNote(this.id).then(note => this.note.value = note)
this.note = signal(null)
render(this, this.render)
}
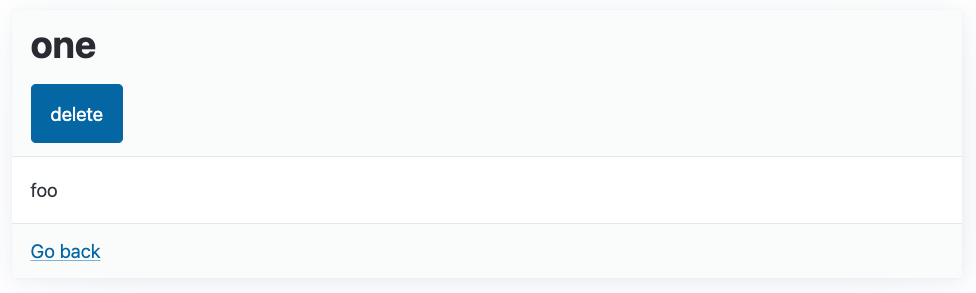
render = () => html`
<main class="container">
<article>
<header>
<h1>${this.note.value?.title}</h1>
<button onclick=${() => delNote(this.note.value.id)}>delete</button>
</header>
<main>${this.note.value?.text}</main>
<footer>
<a href="/">
Go back
</a>
</footer>
</article>
</main>
`
},
)
This work the same as the page-list.js file, so we won’t explain it in every details, if you need you can check the part 1 for in depth explanation.
The result is this:
There are just a couple of things to call out:
connectedCallback() {
  this.id = this.getAttribute('id')
  this.note = signal(null)
  getNote(this.id).then(note => this.note.value = note)

  render(this, this.render)
}
First, we get the note id from the custom element attribute id. Then we fetch the note by its id. We are using the local storage in this example, so the fetch is synchronous, but let’s treat is as asynchronous, so it will be easy to switch to the indexed DB or to an API call later. If the fetch is asynchronous we won’t have the note when the component loads, il will arrive later, and when it will arrive the component should update, so we need a signal here.
// data.js
export const getNote = (id) => {
  return Promise.resolve(notes.value.find(note => note.id === id))
}
The second thing to note is that, since we have 2 pages now, we need a way to change the page on the front end. To change page on the web we use a link, and since we are using the native browser navigation we can just use a good old regular <a> element. This is one of the niceties of using the Navigation API. No need to use a custom component to render a link.
<footer>
  <a href="/">
    Go back
  </a>
</footer>
The last bit to put in place is a link from the list page to the single page:
${notes.value
  .filter(note => (note.title + note.text).toLocaleLowerCase().includes(searchTerm.value))
  .map(note => html`
      <article>
        <header>
          <h1>${note.title}</h1>
          <button onclick=${() => delNote(note.id)}>delete</button>
        </header>
        <main>${note.text}</main>
        <footer>
          <a href=${note.id}>
            Read more
          </a>
        </footer>
      </article>
    `)}
Now we have a fully functional client side navigation using only the web platform!
As usual, you can find all the code of this part in this repo.
In the next post we will implement the last missing feature: note editing, see you soon.